-
Overview
-
Getting started
-
Windows
- Preparing your computer
- Preparing your headset for streaming
- Connecting your headset to your computer using a cable
- Attaching a USB Type-C cable to VIVE XR Elite
- Connecting VIVE Focus Vision to your computer using the VIVE Wired Streaming Kit
- Connecting your headset to your computer to stream wirelessly
-
-
Using VIVE Streaming
-
VIVE Streaming FAQs
-
General (VIVE Streaming)
- VIVE Streaming doesn't want to launch on my computer. What can I do?
- I've started streaming but I don't see anything in the headset except for a loading animation. What should I do?
- VIVE Streaming can't update successfully. What should I do?
- How do I make VIVE Streaming communicate through Windows Defender Firewall?
- How do I resume playing a PC VR title?
- What should I do if I have trouble running OpenXR titles?
- Why doesn't the PC VR title launch after selecting it in the Library?
- What should I do if controllers don't work properly when streaming apps?
- What should I do if I can't successfully scan the QR code when setting up wireless streaming?
- How do I copy screenshots and screen recordings to my computer?
- What should I do if the scene is too high or low and is not centered to the correct location?
- Can I play MR apps while using a DisplayPort connection?
- Does the VIVE Wired Streaming Kit or VIVE Streaming Cable charge the headset's battery?
- How do I update the converter's firmware?
- Why are tracked controllers' buttons unresponsive?
-
Tracking
- Are hand tracking and VIVE Wrist Tracker supported by VIVE Streaming?
- What should I do to make sure eye and facial tracking work properly in VRChat?
- How do I set up full-body tracking in VRChat?
- What facial expressions does VIVE Streaming support?
- What should I do if eye and facial tracking are not working properly?
-
Performance
- How do I improve VIVE Streaming performance?
- I'm experiencing some content jittering when streaming, what can I do?
- The content seems to be stuttering a lot and the streaming experience is not what I was expecting. What can I do?
- How do I adjust graphics and performance settings for VIVE Streaming?
- Why am I experiencing stuttering in my PC VR streaming session while using VIVE Ultimate Tracker?
- Why doesn't my streaming session start right away and I see a "Preparing VIVE Ultimate Trackers" message every time?
- What should I do if I see a small area in VR flashing white while playing games?
- Is 120 Hz refresh rate supported?
-
Connections
- After starting my streaming session on my headset, I see a green screen. What should I do?
- How do I see what someone is seeing in the headset?
- My computer doesn't recognize the headset and the USB icon on VIVE Hub is gray. What can I do?
- How do I show others what's inside the headset while doing wireless streaming?
- I can't get wireless streaming to work, what can I do?
- Are there any differences between the VIVE Streaming Cable and the VIVE Wired Streaming Cable in the VIVE Wired Streaming Kit?
- My computer only has a USB Type-C port, can I still use the VIVE Wired Streaming Kit?
- Why is it still USB streaming even when I've connected VIVE Focus Vision to a DisplayPort port on my computer?
- Can I still use VIVE Ultimate Tracker with my VIVE headset if I'm doing a wired streaming session?
- When do I use UDP or TCP transmission mode?
- Why is my headset's battery power draining and the connection switches to USB streaming even when I'm using the VIVE Wired Streaming Kit?
-
Audio
- The audio sounds broken and there's a lot of noise. What should I do?
- The sound in the headset stutters and sounds distorted and garbled. What should I do?
- Is there a way not to mirror the audio from the headset?
- What should I do if the game's sound effects don't sound full?
- I've started streaming content but I don't hear any sound
-
-
Using VIVE Desk
- About VIVE Desk
- Setting up VIVE Desk
- Starting a VIVE Desk session
- VIVE Desk toolbar
- Changing the display screen mode
- Adding or removing a screen
- Resizing the display screen
- Moving a display screen
- Docking or undocking a display screen
- Adjusting the screen distance
- Adjusting the canvas distance
- Turning on assistive passthrough
- Setting mouse cursor behavior
-
VIVE Desk FAQs
-
General (VIVE Desk)
-
Windows (VIVE Desk)
- Why is the audio coming out from the headset and not my Bluetooth headphones?
- What should I do when a "time out" message appears?
- What should I do when VIVE Desk is not connecting?
- Why does my PC screen go to sleep when I use VIVE Desk?
- Why don't text and apps look bigger even if "Enlarge text and apps" in settings is selected?
- Why is my external monitor not showing anything after exiting VIVE Desk?
- Why does my PC screen keep flashing when starting VIVE Desk?
-
-
VIVE Ultimate Tracker
-
Appendix
Preparing your computer
Make sure you have all the software installed on your VR-ready computer to run the
VIVE Hub services you've installed.
Note:
- Make sure the computer GPU driver is up-to-date.
- Connect your computer directly to your Wi-Fi router using an Ethernet cable.
- Make sure the SteamVR software has been downloaded and launched to complete the installation. You can get it from: https://store.steampowered.com/app/250820/SteamVR/.
-
Install the
VIVE Hub software on your computer and the services you want to use. See
About
VIVE Hub services.
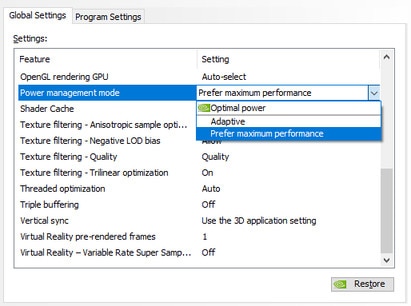
Note: If you're using an NVIDIA graphics card, on your computer, open the NVIDIA Control Panel. Under 3D Settings, click Manage 3D settings. On the Global Settings tab, look for Power management mode, and then set it to Prefer maximum performance.
- Finally, make sure you've installed the VR titles on your computer.
Note: If you're using a laptop:
- Make sure the laptop is plugged in to a power source.
- If your laptop is using an
NVIDIA graphics card, open the
NVIDIA Control Panel. Under
3D Settings, click
Manage 3D settings. On the
Global Settings tab, look for
Preferred graphics processor, and then set it to
High-performance NVIDIA processor.
You don't need to set Preferred graphics processor if your laptop only has a dGPU.
- If you're going to use a DisplayPort connection (VIVE Focus Vision only) and your laptop is using an NVIDIA graphics card, open the NVIDIA Control Panel and check if it has Manage Display mode under 3D Settings. If you see the Manage Display mode option, click it, and then select NVIDIA GPU only.
Was this helpful?
Yes
No
Submit
Thank you! Your feedback helps others to see the most helpful information.