Setting up VIVE Ultimate Tracker
Before using
VIVE Ultimate Tracker, you'll need to set it up.
See the following topics for ways to set up the tracker.
Setting up VIVE Ultimate Tracker using VIVE Manager
Set up
VIVE Ultimate Tracker using
VIVE Manager.
Important: Before pairing with your headset, make sure:
- The VIVE Wireless Dongle is connected to the headset and the headset is turned on and not in sleep mode. See Attaching the VIVE Wireless Dongle to VIVE XR Elite or Attaching the VIVE Wireless Dongle to VIVE Focus Vision or VIVE Focus 3.
- VIVE Manager (version 2.0.33 or later) is installed on your phone and paired with your headset.
- VIVE XR Elite software version is 1.0.999.508 or later or if using VIVE Focus 3, software version must be 6.0.999.948 or later.
- After updating the software of VIVE Focus 3 to support VIVE Ultimate Tracker, restart the headset. If you're using VIVE Location-Based Software Suite (LBSS) with VIVE Focus 3, see What should I do if I'm using VIVE Location-Based Software Suite (LBSS) with VIVE Focus 3?.
-
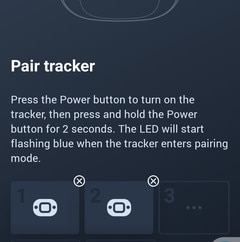
When
VIVE Ultimate Tracker is paired and connected, a tracker icon will appear in one of the slots.
You can pair up to five trackers at a time.
-
Hold each tracker in front of your chest with the cameras facing outward until you see the blue numbered label above the tracker in VR.
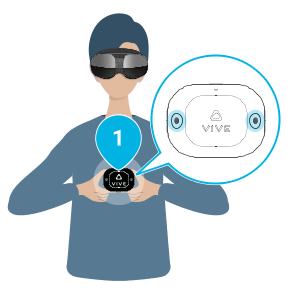 Important:
- You'll need to do this for each tracker that you've paired.
- Make sure you're not covering the tracker's cameras with your fingers while holding the tracker.
- After setting up, you can assign a role to your tracker. See Assigning motion tracker roles via VIVE Manager.
- In , select ? in the upper right to learn how to troubleshoot tracking issues and see tips on how to attach trackers for optimal tracking.
Setting up VIVE Ultimate Tracker in VR
Set up
VIVE Ultimate Tracker in VR.
Important: Before setting up your headset, make sure:
- The VIVE Wireless Dongle is attached to the headset. See Attaching the VIVE Wireless Dongle to VIVE XR Elite or Attaching the VIVE Wireless Dongle to VIVE Focus Vision or VIVE Focus 3.
- VIVE XR Elite software version is 1.0.999.508 or later or if using VIVE Focus 3, software version must be 6.0.999.948 or later.
- After updating the software of VIVE Focus 3 to support VIVE Ultimate Tracker, restart the headset. If you're using VIVE Location-Based Software Suite (LBSS) with VIVE Focus 3, see What should I do if I'm using VIVE Location-Based Software Suite (LBSS) with VIVE Focus 3?.
-
Once
VIVE Ultimate Tracker is paired and connected, a tracker icon will appear in one of the slots.
You can pair up to five trackers at a time.

-
Hold each tracker in front of your chest with the cameras facing outward until you see the blue numbered label above the tracker in VR.
Important:
- You'll need to do this for each tracker that you've paired.
- Make sure you're not covering the tracker's cameras with your fingers while holding the tracker.
- After setting up, you can assign a role to your tracker. See Assigning motion tracker roles via VIVE Manager.
- In , select ? in the upper right to learn how to troubleshoot tracking issues and see tips on how to attach trackers for optimal tracking.
Related How-tos
Was this helpful?
Yes
No
Thank you! Your feedback helps others to see the most helpful information.