-
System requirements
-
Headset and headphones
-
Headset
- About the VIVE Cosmos headset
- Putting on the VIVE Cosmos headset
- Can I wear prescription glasses while using the headset?
- Adjusting the IPD on the headset
- Flipping up the visor
- Connecting a USB device to VIVE Cosmos
- Removing or reattaching the face cushions
- Removing the front and back pads
- Reattaching the front and back pads to the headset
- Reattaching the headset cable strip to the back pad
- Detaching the top strap from the headset band
- Attaching the top strap to the headset band
- Cleaning the headset lenses
- Cleaning the face cushions
- Caring for your VIVE Cosmos
- Installing the VIVE Cosmos External Tracking Faceplate
- What does the status light on the headset mean?
-
Headphones
-
-
Link box
-
Converter
-
Base stations
- About the VIVE base stations
- Installing the base stations
- Tips for setting up the base stations
- Using the mounting kit
- Updating base station firmware via Bluetooth
- Updating base station firmware via cable connection
- What does the status light on the base stations mean?
- What should I do if a base station is not detected?
- Can Base Station 1.0 be used with SteamVR Base Station 2.0?
- Which VIVE hardware is compatible with my base stations?
- Is accidental base station damage covered by warranty?
-
Controllers
- About the VIVE controllers
- Charging the controllers
- Turning the controllers on or off
- Pairing the controllers with the headset
- Attaching the lanyards to the controllers
- Updating controller firmware
- What does the status light on the controllers mean?
- What should I do if a controller is not tracked?
- How do I know which controller is not tracked?
- What can I do if the controller trackpad is oversensitive?
- What should I do if my controller won't turn on?
- The controller automatically turns off. What should I do?
- How do I recover my controller after an interrupted update?
-
Play area
- What is the play area?
- Planning your play area
- Choosing the play area
- Setting up VIVE Cosmos for the first time
- Setting up a standing-only play area
- Setting up a room-scale play area
- Verifying your setup
- After setting up, how do I turn the VIVE system on?
- What is the recommended space for the play area?
- Can I include space occupied by furniture for the play area?
- Can seated/standing-only experiences work at room scale?
- How do I fix download errors during VIVE Setup installation?
- I can't complete the room setup. What should I do?
-
Settings
- System Dashboard
- Changing the Chaperone settings
- How can I capture screenshots in VR?
- Disabling Volume limit
- Enabling motion compensation
- What is motion compensation?
- Updating the firmware
- Troubleshooting VIVE Cosmos
- Joining the VIVE Cosmos beta program
- Seeing real surroundings
- What do the error codes and messages mean? What can I do?
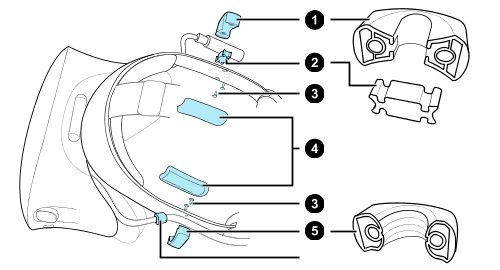
Attaching the cable guides to the headset band
Note: To use your own headphones with
VIVE Cosmos, you'll need the replacement kit for headphones. For details on how to get the kit, contact
Customer Care.
Before plugging in your earphones, attach the audio cable guide and headset cable guide to the headset band.
Note: The cable guides are included in the replacement kit for earphones. Before you attach the cable guides, make sure to remove the on-ear headphones from the headset band, including the front pad and side cushions. For details, see
Detaching the on-ear headphones from the headset band.
Use a cross-shaped screwdriver (PH00) to attach the screws.
|
- On the right side of the band, place the audio connector between the rubber pad and audio cable guide. Align the holes on the band, rubber pad, and audio cable guide, and then screw in place.
- On the left side of the band, align the headset cable guide holes with the holes on the band, then screw in place. Make sure that the headset cable passes through the headset cable guide. The stopper on the headset cable must also be placed on the visor side of the cable guide.
-
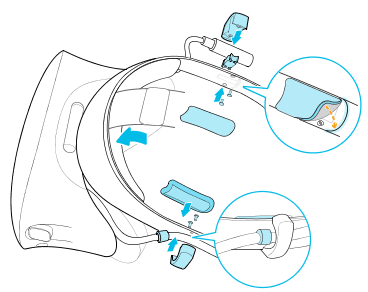
Reattach the front pad and side cushions to the headset band. Make sure that each side cushion is aligned with the curvature on the band.
After attaching the cable guides, you can now plug in the earphones. For details, see Plugging in your earphones.
Was this helpful?
Yes
No
Submit
Thank you! Your feedback helps others to see the most helpful information.