-
System requirements
-
Headset and headphones
-
Headset
- About the VIVE Cosmos Elite headset
- Putting on the VIVE Cosmos Elite headset
- Can I wear prescription glasses while using the headset?
- Adjusting the IPD on the headset
- Flipping up the visor
- Connecting a USB device to VIVE Cosmos Elite
- Removing or reattaching the face cushions
- Removing the front and back pads
- Reattaching the front and back pads to the headset
- Reattaching the headset cable strip to the back pad
- Detaching the top strap from the headset band
- Attaching the top strap to the headset band
- Replacing the front cover
- What does the status light on the headset mean?
-
Headphones
-
Product care and maintenance
-
-
Converter
-
Base stations
- About the VIVE base stations
- Installing the base stations
- Tips for setting up the base stations
- Using the mounting kit
- Updating base station firmware via Bluetooth
- Updating base station firmware via cable connection
- What does the status light on the base stations mean?
- What should I do if any of the base stations is not detected?
- Can Base Station 1.0 be used with SteamVR Base Station 2.0?
- Which VIVE hardware is compatible with my base stations?
- Is accidental base station damage covered by warranty?
-
Controllers
- About the VIVE controllers
- Charging the controllers
- Turning the controllers on or off
- Pairing the controllers with the headset
- Attaching the lanyards to the controllers
- Updating controller firmware
- What does the status light on the controllers mean?
- What should I do if a controller is not tracked?
- How do I know which controller is not tracked?
- What can I do if the controller trackpad is oversensitive?
- What should I do if my controller won't turn on?
- The controller automatically turns off. What should I do?
- How do I recover my controller after an interrupted update?
-
Play area
- What is the play area?
- Planning your play area
- Choosing the play area
- Setting up VIVE Cosmos Elite for the first time
- Setting up a standing-only play area
- Setting up a room-scale play area
- Verifying your setup
- After setting up, how do I turn the VIVE system on?
- What is the recommended space for the play area?
- Can I include space occupied by furniture for the play area?
- Can seated/standing-only experiences work at room scale?
- How do I fix download errors during VIVE Setup installation?
- I can't complete the room setup. What should I do?
-
Settings
- System Dashboard
- Changing the Chaperone settings
- How can I capture screenshots in VR?
- Disabling Volume limit
- Enabling motion compensation
- What is motion compensation?
- Updating the firmware
- Troubleshooting VIVE Cosmos Elite
- Joining the VIVE Cosmos Elite beta program
- Seeing real surroundings
- What do the error codes and messages mean? What can I do?
Using the mounting kit
For best results, install the base stations using a mounting kit. If you purchased the first-generation
VIVE, it has the mounting kit in the box.
Otherwise, you can separately purchase a similar mounting kit from a third-party supplier.
Note: You will need a screwdriver or drill to install the mounts. Ask a professional for help when using power tools.
-
Mark where you want to install each of the mounts on your wall, and then screw the mounts in.
When mounting on concrete or drywall, first drill ¼ inch holes and insert anchors before screwing mounts in.
- Rotate the base station to screw it onto the threaded ball joint. Do not screw the base station all the way in, only enough to be stable and oriented correctly.
-
Tighten the wingnut to the base station to secure it in place.
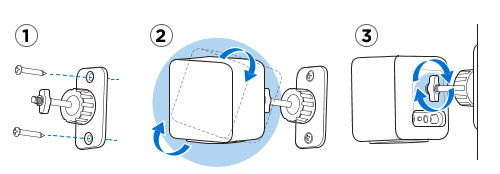
- To adjust the angle of the base station, loosen the clamping ring while carefully holding the base station to prevent it from falling.
-
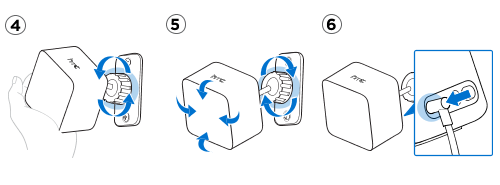
Tilt the base station toward the play area.
Make sure it has an unobstructed view of the other base station. Each base station has a 120-degree field of view. They should be angled down between 30 and 45 degrees.
To fix the angle of the base station, tighten the clamping ring back in.
-
Attach the power cable to each base station.
Was this helpful?
Yes
No
Submit
Thank you! Your feedback helps others to see the most helpful information.