-
Introduction
-
Hardware
-
System setup
- Setting up VIVE Mars CamTrack
- Example virtual production studio setup
- Connecting Mars to your PC
- Mounting VIVE Tracker (3.0) to Rover
- Connecting Rover to Mars
- Setting up the base stations
- Tips for setting up the base stations
- Adding Mars as an endpoint in Unreal Engine
- Enabling FreeD on Mars and adding Mars to Aximmetry
- Manually updating the Mars firmware
-
Camera calibration
-
Real-time compositing in Unreal Engine
-
FAQs
- How many base stations can I use?
- Can I use an odd number of base stations?
- Cleaning the base stations
- Can I use more than one VIVE Tracker (3.0)?
- Why does VIVE Tracker (3.0) automatically turn off?
- How do I verify that VIVE Tracker (3.0) is detected?
- What does the status light on VIVE Tracker (3.0) mean?
- Why doesn't the VIVE Tracker (3.0) status icon on the Mars dashboard turn blue?
- Troubleshooting VIVE Tracker (3.0)
- Why can't I see the incoming video feed in the Camera Calibration Tool?
Setting up VIVE Mars CamTrack
In addition to the included hardware components, you'll need an IP router and a PC equipped with a virtual production engine.
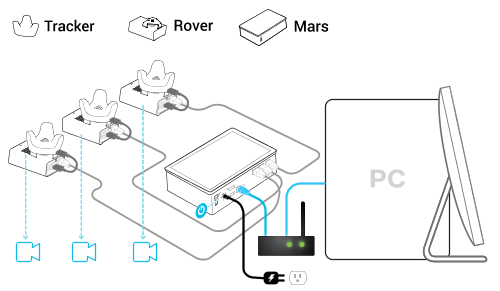
- Connect Mars to your PC using an IP router.
-
Connect
Mars to a power outlet using the included AC adapter and power cord.
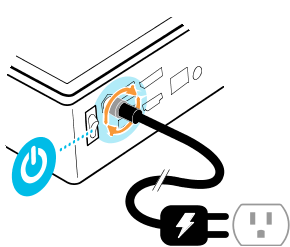
- Power on Mars.
- Mount VIVE Tracker (3.0) to Rover.
- Connect Rover to Mars. Rover will turn on automatically.
-
Check the
Mars dashboard to confirm that
Rover is detected.
See Mars for details on the Mars dashboard.
Note:Even if the status light on VIVE Tracker (3.0) isn't green, it can still be tracked. Just check the status icon on the Mars dashboard to confirm the tracking status.
See What does the status light on VIVE Tracker (3.0) mean? for details.
- Set up the base stations, but do not connect them all to power at the same time. See Setting up the base stations.
- Connect Mars to your virtual production software. See Adding Mars as an endpoint in Unreal Engine.
- Set up the calibration board and start collecting calibration data. See Setting up the calibration board and Collecting calibration data using the Camera Calibration Tool.
Was this helpful?
Yes
No
Submit
Thank you! Your feedback helps others to see the most helpful information.